Tuesday, March 24, 2015

What's Too Tight and Too Short? Not This Shirt!


So, I've learned that buying clothes from a yard sale or Goodwill can be a gamble with the sizing if you don't try on the clothes. I encountered this problem with both Shirt #1 and Shirt #2 in the above picture. I can't remember why I didn't try them on. I wanna say it was a time issue. Anyways, In the first picture, the shirt is too tight even though the tag assured me it shouldn't be. (Liar, Liar pants on fire!) The problem with Shirt #2 was everything. The cut was awful, there was just no shape whatsoever, and it was way big (it may not look like it in the picture, but trust me on this one). The pattern wasn't bad, and the colors are what prompted me to purchase it. However, that pattern all over the shirt turned out to be just TOO much.  I think I only spent about $5 total on the shirts.
 I'm sure I'm not the only one that feels this way, but I'm a big fan of long shirts. After you hit 30 and have a baby, you tend to not like short shirts. I also don't care for clingy shirts that show any lumps and other such imperfections goin' on under my clothes, amiright?  And if I'm being honest here, most of the shirts I own these days are too clingy for my taste. I think I'm gaining too much weight...or the shirts could be shrinking...Yeah, I like that, lets go with that! ;)
So, I've come up with a really good solution to the too tight, too short problem. I took two shirts and formed them into one miracle shirt! 

 Enjoy this fun tutorial! 

      First, decide which shirt is going to be your main shirt. The other shirt will be for accents.  With the main shirt, cut the side seam open about 10 inches from the bottom. Do this on both sides. (I would have used the seam ripper for this, but since my shirts are knit, I didn't want to rip holes. And lets face it, scissors are faster.) It should look like this:
Next, you're going to cut out two triangle pieces of fabric to make inserts where you cut up the sides seams of the main shirt.  With the accent shirt, I measured 6 inches across the bottom, at an angle measured up 10 inches and at the "point" of the triangle, I made it 1 inch across. (This could vary depending on how loose you want your shirt) Cut out two of these.
 Turn the main shirt inside out. Lay the triangle (right side down) and pin the triangle to the shirt. You want to pin the right sides of the fabric to each other. Once that is done, sew it together. I used a zig zag stitch. Not sure if this is the correct way to do it, but I've found that zig zag works well on knit fabrics. There is actually a special needle you can buy for this, but I don't have one. I think it's called a double needle.
 Now your shirt should be wider than before and not clingy.

To Lengthen your shirt: 

You need to decide how much longer you want your shirt to be. I cut 4" wide and gave myself 1/4" seam allowances. You'll need to measure around the bottom of the shirt to decide how long your strip of fabric needs to be. The best way is to carefully line up your shirt and measure across and double that number. My measurement was 28"x2. But it will probably be different for you. (If you don't have one continuous strip of fabric the length you need, you can sew them together like I did below.)

Once that's taken care of, you need to pin the strip of fabric (right sides together) on the hem of the main shirt.  Then sew all the way around the hem of the shirt. I used a straight stitch on this part. I'm not sure why, I just did. Once you get to the end, you need to sew the two ends of your fabric strip together. Do this carefully, I messed mine up twice.  Oh, and pay no attention to that seam ripper in the picture...I didn't use it, it was just there.
Lastly, if you have any raw edges that you need to hem, you should do this now.

 Wasn't that easy? Now you have a one of a kind shirt that's pretty and comfortable!
I'm so ready for spring...can you tell? =)

These are the accessories I added to my outfit. I got the shoes for 25 cents at a yard sale 2 years ago. The flower barrette is from H&M (on clearance) and I made that bracelet. 


Thanks for reading! I hope this tutorial helps someone salvage shirts they may have thrown away! =) 
*********************************************************************************

If you have time, stop by my online shop. www.zibbet.com/therufflybuffalo 
Wanna win a free ring? 
 I'm having a giveaway on my store's Facebook page. 
You can enter to win one of the rings in the picture below. Winner will be chosen April 10, 2015


Tuesday, March 10, 2015

Ok, So This Isn't A Tutorial....


So, this isn't a tutorial, but a shameless plug for my online shop. =)  I've started making wire rings. Today, I finally uploaded them to my store at Zibbet.com.  I can make any of these rings in US standard sizes 1-15. 
I'd love it and appreciate it if everyone who reads this, goes to my shop and takes a look. Oh! And if you could recommend or share my zibbet page with your friends and family, that would be aces! =D 
Thanks in advance!  

Here's the website to my shop: 

I'm also on facebook:

Friday, January 2, 2015

Fooler Top Tutorial

Since I last refashioned, I decided to go to college full time. And by "go to", I mean enroll in an online university and attend class in my jammies. =) It has kept me super busy though. So that explains why I haven't had time to refashion. I'm on my winter break right now, so I have extra time to be creative. Yay!

Today, I refashioned this:


It all started with the boots. I got these amazing boots on Black Friday. Since I've gained some weight (I really shouldn't have eaten all those sugar cookies while doing homework), I had been looking for a pair of cheap boots with an extended calf. Not that my calves were all that small before the weight gain, but I digress. I got this pair of boots at Payless.

The original price was $69.99 and I got them for $16.99! I know right? I couldn't believe it either! Anyhow, I got on Pinterest to find cute ways to wear my new favorite boots. I found this outfit that I LOVE:


I tried this look the other day. I went "shopping" in my boyfriend's closet to find a long sleeved dress shirt to wear under my grey cable knit sweater. It did NOT look good. And certainly not as cute as the above picture. It could have something to do with the fact that I'm about 6 sizes bigger (at least) than that model. But I'm also gonna say the bulk of both the shirt and the sweater was unflattering. After this, I decided to make a "Fooler Top" (A sweater with cuffs, a collar, and hem). I didn't realize this type of shirt had a name until I googled the description of it. I dug through my big pile of yardsale and goodwill clothes until I found a pink sweater that was too short from being shrunk in the dryer and a short sleeve dress shirt that was WAY too tight (see first picture....EEK!). I figured these two items would make a super cute Fooler Top.
Here's how I did it:
Before I did anything, I ironed the dress shirt. It's way easier to cut without all the wrinkles. Next I spread it out on the floor to mark and cut it. I started with the cuffs. My cuffs have two buttons and a slit above them. I marked 1" above the slit with blue chalk and cut the cuff off the shirt. Then I repeated it on the other cuff.


To cut the collar of the shirt off, I measured and marked 2.5" from the collar out towards the shoulder. Next, I made a mark between the 2nd and 3rd buttons on the shirt. I chalked a straight line from the marks on the shoulders to the mark in between the buttons.


Once the lines were marked, I cut through both layers of the shirt on the straight line.


For the hem, I put the sweater on top of the shirt to see how far I wanted the hem to stick out. Then I made a mark with the chalk so I would know later on where to sew the hem.


Next I measured 2.5" up the side seams and marked it with chalk. (This measurement is a preference. It all depends on how far you want the shirt tail to stick out from under the sweater.)


Once I measured and marked both sides, I made a line with chalk from one side to the other. Then I cut along the line.


This is what all the pieces look like after they are cut out.

The next step was to zig zag the raw edges with the sewing machine.
This is what the zig zagged edges will look like.
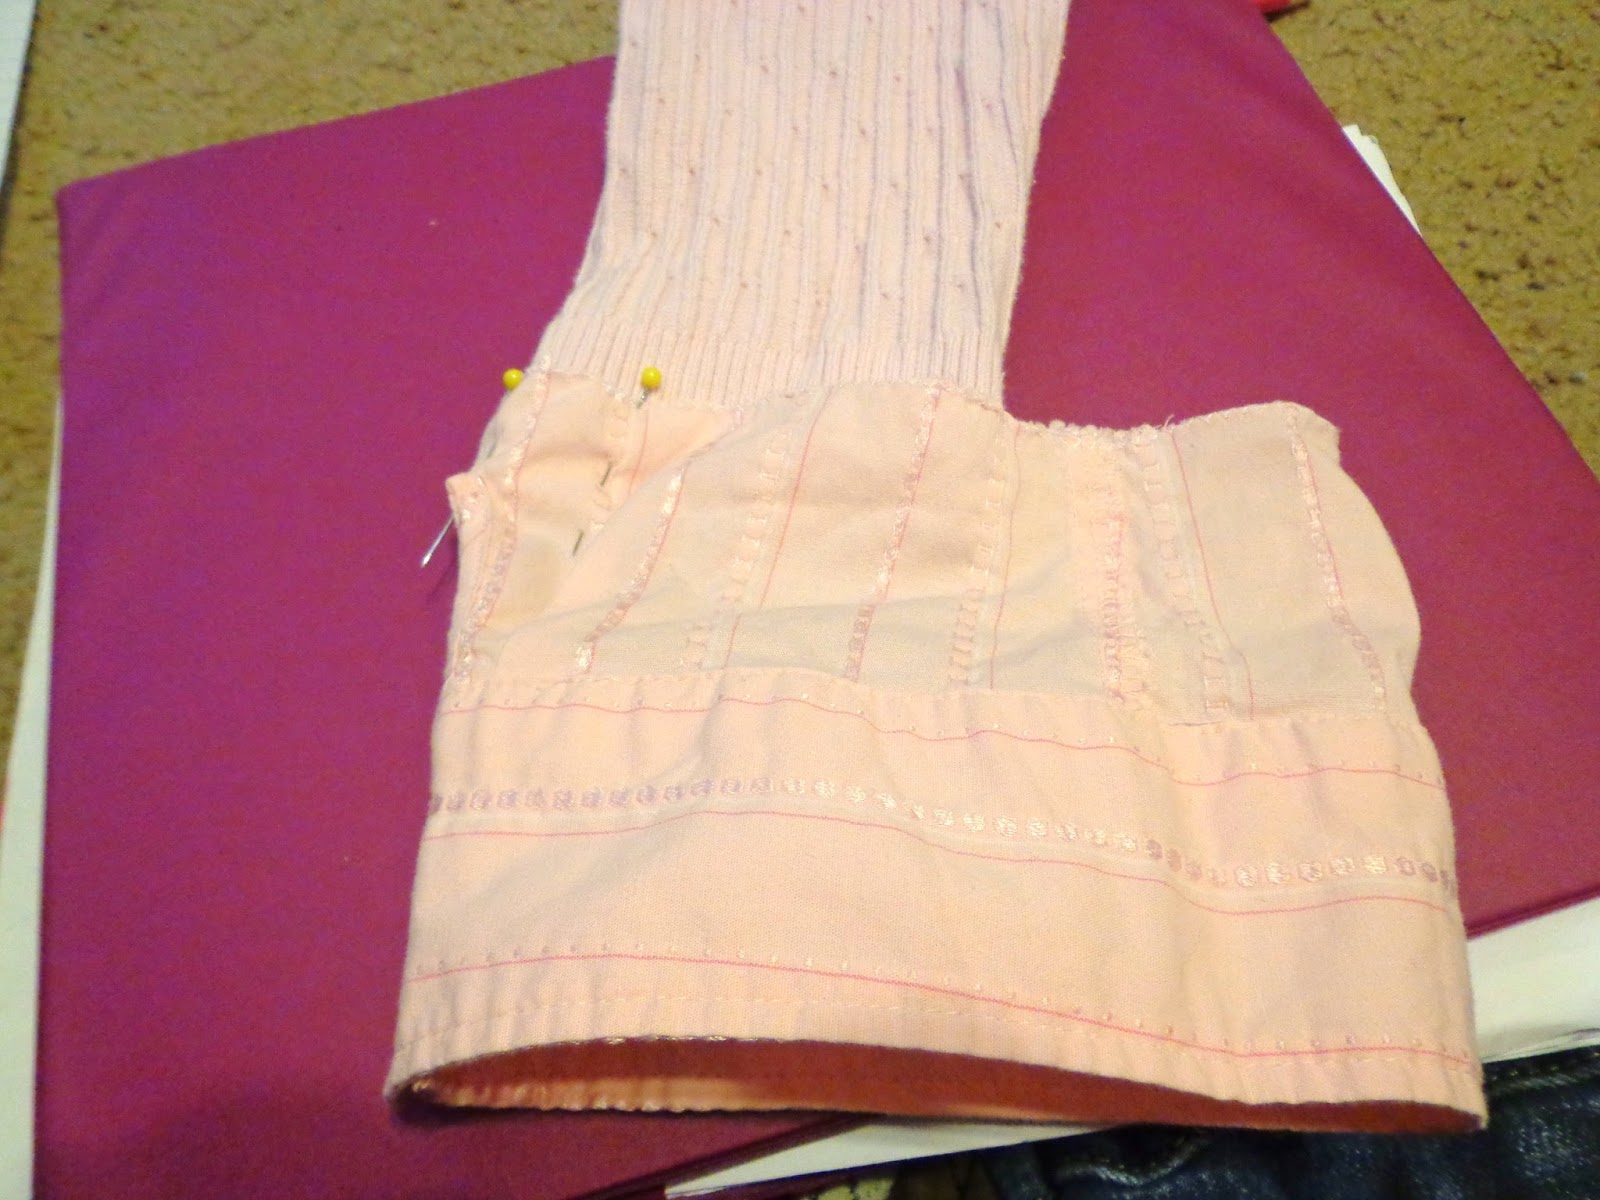
I ran into a problem here...The cuff from the dress shirt is way bigger than the sleeve of the sweater. So I pinned the dress shirt cuff to the sweater sleeve (sweater inside out and cuff right side out...I do it this way because the cuff will be folded up). And took off the excess material to make it match.

Next, I sewed the cuff to the sleeve. Then I did the same with the other cuff.


I pinned the collar to the sweater. I did this with the collar right side out and the sweater right side out so I could see where to sew. 


I ran into another problem here. I sewed all along the seam of the neckline. However, when I tried the sweater on, my head wouldn't fit through the neckhole. So, I took a little bit of the front seam out with my seam ripper. Then I unbuttoned the collar completely, strategically placed and sewed both sides of the button placket to the sweater by hand with a few stitches. You can see where I hand sewed with grey thread in the above picture. 


To sew the shirt tail on, I spread it out against the hem of the sweater. 

Since the shirt tail was smaller than the sweater, I cut the front and back of the shirt tail apart.

Lastly,
I pinned the shirt tail to the sweater where I thought it looked nice and sewed all the way around.
Now I have a top that I like and will actually wear and I think it came out close to the style of the Pinterest picture. It was alot easier to do than I imagined it would be and I think it looks totes presh with my new boots! ;)

Monday, June 30, 2014

DIY Summer Shorts Refashion Tutorial ~ 3 Different Hem Styles ~


There are lots of reasons one might want to make their own shorts from jeans or pants. 
The biggest complaint I've heard from my friends is they can't buy jean shorts for their kids that are long enough.  This would be perfect for that problem!  
Other reasons would be if you get a hole or a stain in the knee or bottom part of the leg of your pants.
Another reason would be if your child grew up but not out and their pants were now too short. Making them shorts would be a great solution. 
I  just want to point out, I've saved so much money refashioning clothes instead of buying brand new.
I really only shop at thrift shops and yard sales anymore.
Refashioning is a real money saver! =)


The first pair of shorts I did this time was for my jeans (capris?) I'm not sure what these were exactly. I got them at a yardsale and they are petites, so I can't decide if they are pants or capris. 
I wanted to make a nice regular hem on my shorts.


The first thing I did was try the pants on.  Then I took a white marking pencil and made a line where I wanted the final hem to be.  I also made a line 1.5" below the top line.


Next, I cut along the bottom line. On both legs.


Then I turned the (now) shorts inside out.  I made a line 1.5" above the raw edge with the white pencil.


I folded the raw edge up twice until it met up with the white line that I made. 
I pinned all around the fold to hold it in place.


I sewed close to the top of the folded edge all the way around the pant leg.


And here is the final product! 
=)


Next up...Cuffed shorts...


For this tutorial, I used a pair of my daughter's capri-type pants to transform them into a cuffed denim short. 
I purchased these at a yardsale at the beginning of summer and it looks like the previous owner must have tried to make a pair of capris from jeans.


I had my daughter try on the pants and
I marked where I wanted the final length of the shorts (while she was wearing them). Apparently, this tickled, because she started laughing uncontrollably. =)   Then I marked a line 1.5" below that line. I used a regular pencil this time because the white pencil line wasn't noticeable.


I cut along the bottom line to make shorts.


Keeping the jeans right side out,
 I folded the raw edge up twice until it lined up with the pencil line I made and pinned.


Lastly, I sewed along the top of the folded edge all around the jeans.
See how fun and cute they turned out? Love them! =) And my daughter said they are way comfy.


And finally...ruffled hem...


This tutorial also works great if you have already purchased a pair of shorts and they are too short. Or if your child's legs have gotten longer and their shorts look shorter. =) It's a great way to lengthen shorts. I suppose you could also lengthen pants or jeans this way as well.


I marked where I wanted the denim section of the shorts to end. (Pay no attention to the top line I made in the picture. This was done by mistake...I got confused, which, if I'm being honest, happens frequently when I'm sewing. =P  )


I cut along the bottom line.

The fabric I'm using for the ruffle came from a vintage sheet I got at a yard sale.  I have an obsession with vintage sheets...it's just so much material for so little money!  And I'm in love with this pattern! It's so pretty.


I measured around the pant leg and added a couple of inches. That's the length of fabric I cut from the sheet. I made the width 2" wide.  Because I'm lazy, I used the finished edge of the sheet, so I wouldn't have to hem it. =D


I sewed a gathering stitch on the raw edge of the flowered strip...this made an automatic ruffle.


With the right sides together, I pinned the raw edge of the ruffle to the raw edge of the denim.  (I overlapped a tiny bit at the end.) 

I sewed them together making sure to stitch just below the gathering stitch. 
Once I was done with that, I used a zigzag stitch on the raw edges of the ruffle on the inside of the shorts. 
The final step was to iron the ruffle down. 


Here is the end result! How cute are these?!?  I love them! They are so cutesy!

Thanks for reading! =) 


****If you have the time, please visit my zibbet.com shop! ****
www.zibbet.com/therufflybuffalo


Thanks!