Friday, February 21, 2014

A Denim Overhaul


A girl and $7.82 walk into a Goodwill....
Don't all good refashion stories start this way?  =)

My facebook friend, Robin, suggested a refashion project of bleaching and dyeing jeans a pastel color.  When I saw it, I totes wanted to try it. (Yes, I said "totes" and no, I don't care that I'm probs too old to use that slang.) 
Anyhow, I decided that I needed a pair of light purple jeans. It was a toss up between light purple and mint green. But I thought light purple would be easier to achieve. Green dye could have accidentally produced lime green or kelly green (neither of which are a good look on me.)
So I spent Tuesday morning looking through every pair of women's jeans at Goodwill.
I ended up finding a pair of Tommy Hilfiger jeans in my "Goodwill size".  What's a "Goodwill size", you ask? Well, you see, it's a size or two bigger than I normally wear. I found that I need to purchase things in my Goodwill size because alot of the clothes donated to Goodwill have been shrunk. Seriously, they should just call the place "Shrunken Treasures".  
I made sure my jeans were 100% cotton.  I read online that jeans with lycra, spandex and all that stretchy material would just shred when bleached.
So if you do this, make sure you have jeans that are 100% cotton. 
I decided on a pair of mom jeans from the 90's. 
I'm also gonna (hopefully) refashion that sweater that I'm wearing in the above picture. Which I'm pretty sure also came from the 90's.  If I put on some Bass Buc shoes and a huge gold herringbone chain and I'll feel like I'm back in high school.


To get started, I needed the following:
A big Rubbermaid tote
bleach (not color safe)
the jeans
fabric dye...I used Rit
Some sort of measuring cup (I used 1 cup)
Ignore the hydrogen peroxide...I was gonna use it to neutralize the bleach but didn't do it. 


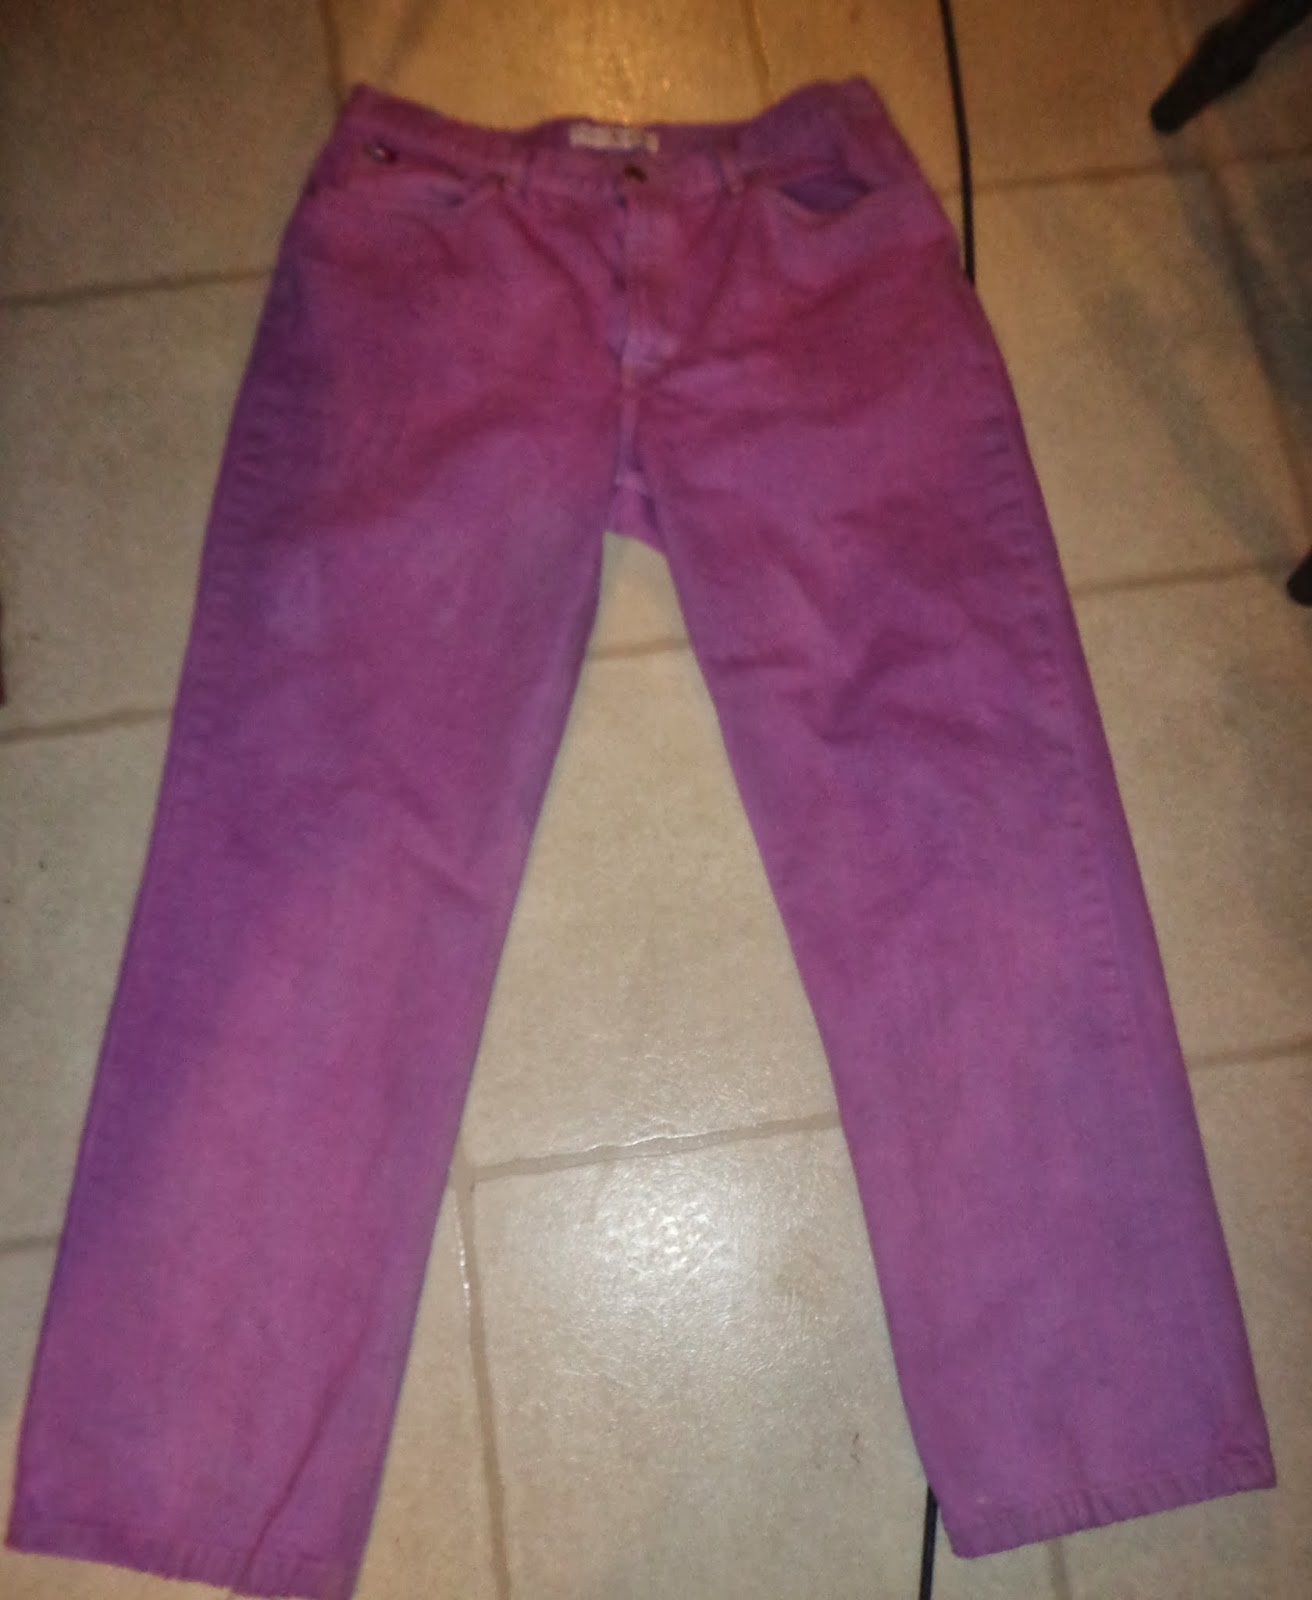
The jeans before

Another pic of the jeans before

To start, I needed to bleach the jeans before I dyed them. 
In the tub, I mixed 3 parts lukewarm water with 1 part bleach.
I kept them in this tub for 4 hours. **Note, you might want to do this part outside or in a garage. Especially if you live in a small space. The bleach smell is strong.**


After the 4 hours, I removed the jeans, dumped out the bleach water, and put my jeans in the washer for a rinse and spin only...no detergent. Then I put them in the dryer. (I now realize I probably shouldn't have dried them...it made them pretty snug at the end of the process.)


This is how they looked after the first bleaching, rinsing, drying cycle.
A close up after the first bleaching, rinsing, drying cycle.

I added a new batch of bleach/water mix and put in the jeans.
This time I left them in there for 5 hours. Then I rinsed in the washer (no detergent) and dried them in the dryer.

This is how they look after the second bleaching, rinsing, and drying.


Another close up.
Ok, I should have actually done two more bleaching cycles. 1 for 10 hours and another for 11 hours.  However, I stopped here for 2 reasons. 
1) Since I was dyeing the jeans purple, I figured it would be ok to leave a little bit of blue on the jeans.
and
2) Do you see the white spots around the edges of the pockets in the picture below? The fabric was pretty thin there and I didn't want the bleach causing any holes.

Something that happened that I didn't expect was the bleach totally wiped the Tommy logo off the leather patch. Weird huh?


Now, onto the dye...

I used the same rubbermaid tote (I rinsed it alot after I poured the bleach water out).
I followed the instructions on the Rit dye bottle..sort of.  I mixed everything the way it said to, but it said to stir the jeans in the dye for 30-60 minutes. I did not do this. I had planned to stir the jeans for 20 minutes since I just wanted light purple.  However, when I added the jeans to the dye, it started turning, like, Barney purple within 5-7 minutes. When I realized it was already medium purple, I stopped right then.  I rinsed the jeans until the water ran clear. I did this part in my yard with my water hose. I didn't want to stain my bath tub. Once the water ran clear, I washed the jeans in the washing machine with detergent and then put them in the dryer.

When I put the jeans in the dye


After I rinsed them until the water ran clear.


What the jeans looked like after I washed them in detergent.


The jeans after the final wash and dry


The final color of the jeans


Now, to turn the Mom jeans into a lower rise straight leg jean.

First, try on the jeans inside out.  With straight pins, pin the jeans close to the leg. Starting at one ankle and working your way to the other ankle. Also pin the crotch.  I had to take the pants off to pin my jeans.  Once pinned, turn the jeans inside out to check that everything looks ok.  Also, carefully try them on to make sure the fit is ok.  Be supes careful though, I shoved a straight pin into my leg when I tried them on.


If everything looks and feels ok, it's time to sew.
Sew along the pinned line. Once that is sewn, turn the jeans right side out and try them on.  If everything is good, cut the excess fabric off.  Now sew a zig zag seam on the raw edges where you just cut. 


Like the hello kitty machine? It's actually my 6 year old daughter's machine. I had to borrow hers because the  needle on mine broke.  =(
This is what the straight seams and zig zag seams look like.


Now I have a pair of purple jeans with a lower waist and straighter legs! ( And they only cost $4.69 for the jeans and $2.96 for the dye!) 
Doesn't that sound easy? =)

I hope this tutorial made sense. I've been sick for the past 2 days and feel a little loopy. So if you have any questions about this tutorial, just ask and I'll try to help.  =) 


I rolled up the jeans a little. They were kind of long.


Thanks for reading!

**If you have some time, check out my zibbet shop!**
www.zibbet.com/TheRufflyBuffalo 


Wednesday, January 29, 2014

Shoe Refashion with Acrylic Paint


Shoe Refashion!


Lately, I've had this obsession with ballet flats.  I have this one pair that are navy blue and have a flowered print on them...they are my favorite! And I've gotten so many compliments on them.  I got them on sale at Gabes for $7.99! 
So, now I want to have a pair of ballet flats for every outfit. =)
 And I decided to make some purple flats!
I love how these turned out!

To refashion a pair of shoes like this you'll need:

Shoes (Mine cost $3 and I got them at goodwill...surprise, surprise ;) )
Rubbing Alcohol
Acrylic Paint
Mod Podge
Scissors
Paint Brush
Hot Glue

This is how the shoes looked before I did anything to them.


I grabbed my scissors and snipped off that stringy bow.


The next move was to pour rubbing alcohol on a cotton swab, tissue, etc...I used toilet paper.  I rubbed that alcohol soaked t.p. all over the outside of the shoes. This step strips off that shiny coating from the shoe and helps the acrylic paint "stick" to your shoe.
Next, I let the shoe dry.  This didn't take long. 


On to the painting....
The paint I used was acrylic craft paint in the color Plum.
I brushed on a thin coat of paint on the shoe. I used an actual paintbrush. However, if you don't want to deal with any stray bristles that might fall off, you could also use a sponge brush.

This is what one coat of paint looks like: 


I let each coat of paint dry completely before adding another coat. I ended up doing about 6 coats of paint.
After the last coat of paint dried, I painted one coat of mod podge (I used generic homemade mod podge on mine).
This is how they look after the coat of mod podge dried.


Now I had to decide what embellishment I wanted on this shoe. I originally wanted a white lace bow on each one.  However, when I sewed the little bow and held it up, it wasn't a great look.
Then it dawned on me that my boyfriend's grandmother had just given me a HUGE bag of buttons!
So I searched through the treasure trove of buttons and found these:

My 6 year old daughter suggested that we make these into earrings. But seeing as how I'm not a Golden Girl, I decided they would look better on a pair of shoes than on my ear lobes. ;)


 I started out by hand sewing the buttons on to keep them in place.


And to keep the buttons from moving around, I used hot glue to really secure them on the shoe. 


And this is the finished product!
Cute, right? 


And I have the most perfect sweater to go with my new shoes! YAY! =D

Thanks for reading!
*****Check out my Zibbet shop! *****

http://www.zibbet.com/TheRufflyBuffalo
Thanks! =)


Thursday, January 2, 2014

Shirt Too Big? Not A Problem!


I just love long shirts. And one problem I'm having lately is finding shirts long enough.  Most of the ones I find are usually short and I have to keep pulling them down as to not show skin.  I think I've finally found a solution to this problem!
I'm just gonna buy shirts way to big on me and alter them everywhere, but the length.  It's alot easier to do than I thought! 

While I was out of town this Christmas, I made a stop at an out-of-town Goodwill.
I loved it! That place was huge, the prices were great, and the merchandise was really nice.  I wanted to get some sweaters to refashion, and since I wasn't familiar with the layout of this particular Goodwill, I started out looking at the Plus size rack by accident.  That's when I spotted this beauty.  It's gold with sparkly thread going through it.  It was also 5 sizes too big.  But I wasn't gonna let that be a problem. 

Before I get started, I would like to point out that in the before picture (with shoulder pads), this shirt totally looks like something Blanche Devereaux from the Golden Girls or Charlene Frazier from Designing Women would wear.

This is what I did....

First, I cut off the shoulder pads.
Next, I carefully cut off the sleeves along the seams.


armhole without the sleeve

sleeves
I tried on the sweater inside out and pinned the shirt closer to my body starting at the armpit (which is gonna be huge because the shirt was 5 sizes too big). 


Next, I tried on one of the sleeves (inside out) and pinned the fabric to make it fit tighter on my arm.  Then I did the same thing with the other sleeve.


I put the sweater in the sewing machine and sewed along the line of pins.


This is what the seams should look like now.

At this point, I turned the shirt right side out and tried it on to make sure I took in the fabric enough.
Next, I turned the shirt inside out again, and pinned the sleeves (also inside out) to the shirt. I started pinning at the top at the shoulder seam and pinned until the pieces on both sides of the shoulder seam met at the armpit seam.  If there is excess fabric (and there probably will be), it's ok. You'll just trim that off later after you sew the sleeve to the shirt.


Then I put it in the machine and sewed along the pin line.


Once I did that on both sides,
 I tried on the shirt right side out just to make sure everything looked right.
And it did!
 YAY! =) 
 I wore this shirt on New Years Eve. And it was super comfy and pretty!


 ***If you have some time, swing by my Zibbet shop and take a look around!***

www.therufflybuffalo.com
 

Thanks! =D

Wednesday, November 27, 2013

Refashion A Skirt Into An Infinity Scarf


From This...


To This....


Here's how....

This started out as a long straight skirt.  I cut off the waist band, used a seam ripper to take the zipper out, and took out the back seam to open up the skirt. I put it out on the floor to measure and cut the fabric. I wanted my scarf to be on the skinny side because I don't feel comfortable with alot of bulky material around my neck, so I measured 7 inches from the bottom of the skirt and cut from one side to the other. I realized that my strip of fabric wouldn't be long enough for an infinity scarf, so I cut two strips of fabric the same width and length.


I cut two strips so I could sew them together end to end to make them long enough.  It made my fabric strip 70".  That was just the right amount for my infinity scarf to wrap around my neck twice and be the length I was comfortable with.
Next, I folded my fabric in half lengthwise and pinned. (At this point, check to make sure both ends are the same size...if they aren't, trim them with scissors until they match. This will make it easier when you sew the ends together later on.)


Now, onto the sewing...
I sewed down the long side with a 1/2" seam allowance.
Once I was finished sewing, I ended up with an inside out tube of fabric.


This would be the point where you would iron the seam open. I didn't do this because I'm lazy and didn't want to drag out my ironing board. I do recommend this step if you a) like things perfect or b) you are giving this as a gift.  Neither of these applied to me so I didn't care. ;)
Next, I turned the fabric right side out.


Now this is the tricky part. (not really tricky to do as much as it is explaining how to do it.)  To join the ends together, I matched up the inside seams and pinned. I put the fabric in the machine then sewed my way around the circle sewing the ends together until the circle got too small to sew. At this point, I took the fabric out of the machine, folded the raw ends under and put it back under the needle and sewed the gap shut.  This method makes the seam visible. I, however, didn't care because this scarf is for me and I knew my hair would hide the seam.  If you like things perfect or are giving this as a gift, you should hand sew the rest of the opening shut instead of putting it back in the machine.


And that's all there is to it. Super easy!
So easy, in fact, my 6 year old daughter sewed most of this one and one for herself!(With guidance, of course, but still.)
And I love that I didn't have to go out and buy fabric for this. I just used old clothes that I don't wear anymore! =)

 ****NOTE****

The scarf for my 6 year old was made the exact same way EXCEPT the fabric was cut 7" x 48" and we only cut one strip of fabric.


***If you have some time, swing by my Zibbet shop and take a look around!***

 http://www.zibbet.com/TheRufflyBuffalo


Sunday, November 10, 2013

The Wedding Gown Reveal!

DRUMROLL PLEASE.....


For the back story on when and where I bought this dress, go here.
The lady who sold me the dress originally wore it as a Halloween costume. That's probably why she parted with it for only $5.  Lucky me! =)
Right after purchasing this dress, I made a sketch of what I wanted it to look like in the end and to my surprise it actually looks ALOT like my sketch. Yay!
I've been looking at websites and bridal magazines for wedding gowns and I used the ones I absolutely loved as inspiration for this dress.
Here are a few of those gowns:
A gown from Modern Trouseau


A gown from Alfred Angelo

I know that one of these dresses cost $1500! There is no way I would pay that for something I would only wear once. 
Knowing that the pretty dresses cost that much, I was more determined than ever to turn this $5 monstrosity into the dress of my dreams.
Here's how I made it gorgeous:
The first thing I did was remove all the ruffles on the top of the dress.  Under all the frilliness was a lace covered tank style top with a sweetheart-ish neckline.
It was snug to say the least, so I decided to chop off the very top of the bodice and turn it into a strapless style with a straight across neckline.
My plan for the skirt of the dress was to take off all the lace except the bottom layer.  I was super disappointed to find that the bottom layer of lace was only sewn to the bottom half of the skirt.  The top half was only muslin. So, I had to have two layers of lace instead of one.

This is how the dress looked at this point.


Next, I had to work on the silhouette. With my hips, there was no way I was keeping the full skirt.  I really wanted a mermaid style gown. 
To make this happen, I had to take ALL the lace off of the skirt and I had to put on the dress inside out and pin the excess fabric closer to my body to make a slimmer silhouette.
This part of the refashion was a pain in my tushy. Figuratively and literally. (Hey there were stick pins where stick pins should never be!)
After about the 5th try at doing this, I finally got it right.  However, the end result of this step wasn't pretty. 


See?


Once the silhouette was refashioned, I had to sew the lace back on. Unfortunately, that mess I created with inside of the skirt was visible through the two layers of lace, so I had to sew a panel of lace under my original two layers of lace. Lucky for me that dress came with a ton of ruffles.  It left me with alot of extra matching fabric. This is how it turned out with the panel and two layers of lace when I sewed them all back on:


This picture shows a strap...that wasn't sewed on just yet. It was merely for effect to see if it would look good.  I thought I was almost finished so I emailed the above photo to my older sister Jen for her advice on how it looked. She informed me that the dress, while pretty, was still too poofy.  This led me to taking the lace off the dress and sewing it back on a bunch of times to get it tight enough to not be poofy.
I think it was precisely at that moment when I understood why lace wedding gowns are $1500! =) 


 This is how it looked when I finally made it less poofy.


Next, I sewed a piece of lace into a belt to cover the seam where the bodice and the skirt were sewn together. I sewed it directly to the gown.
The last step was to make some sort of strap or cap sleeve.
I decided on a wide strap, but chose to attach them to the dress close to the underarm instead of right on the seams of the bust.
And after all that hard work, the dress was finally complete!
I don't think I've ever been happier to complete a refashion than I was when I finished this gown. =)
Here are the front and back photos of the completed wedding dress.


I would like to give credit to my 11 year old daughter for taking the after pictures of my gown. I think she did a great job!

Here are the rest of the pictures from our photo shoot....


 Hopefully someday I'll actually get to wear this dress down the aisle. =)

Thanks for reading! 


***If you have some time, swing by my Zibbet shop and take a look around!***
www.therufflybuffalo.com


Tuesday, November 5, 2013

Halloween 2013


Me as "Mary Poppins"
(Pay no attention to the fact that I
have an open umbrella inside my house...
I like to live dangerously)
Viv as "Olivia"


This isn't gonna be a step by step tutorial. Unfortunately,  I didn't take pictures of the costume making process. Mostly because I've been working on the Olivia costume since October 1st and only when I've had extra time. So I never remembered to grab the camera. But I'll do my best to explain what I did. =)


For the Mary Poppins costume:  The only things I had to make for this costume were the bow tie and the hat. Yep, I made the hat. Because of course, when you need something, no store ever has it. EVER.  I already owned the umbrella, purse, and boots.  I got the blouse and the skirt at Goodwill.  I made the bow tie using a tutorial like this one from The Pleated Poppy . 
As for the hat...I found a cardboard box.  I cut a strip a couple of inches wide (this will determine the height of the hat).
Then I bent that strip into a circle and stapled it shut.
Next, I drew a circle on another piece of cardboard bigger than the circle I just made. This will be the brim of the hat. I cut out the middle about the same size as the circle that I stapled shut.
 I used the middle piece of cardboard that I cut out as the top of the hat. I hot glued and duct taped all of the pieces together. 
To cover the cardboard hat, I used a black sheet and hot glue. It didn't have to be perfect, because I was going to use a red ribbon/strip of fabric to cinch the sheet down.  In fact, it turned out somewhat billowy. 
After the sheet was hot glued on, I used a red piece of fabric as a ribbon around the hat and I hot glued that down.
 I then searched my house for some white and yellow flowers. (I actually had to raid a floral arrangement in my living room, but it was totally worth it.) And I hot glued those on.  Once that was done, my Mary Poppins costume was complete. =)


For the Olivia costume:  I actually made most of this costume. I had a pair of red capri pants that I knew I would never ever wear.  So I seam ripped the legs and crotch open all the way to the waistband. Then, I sewed the seams straight down in the front and the back. With leftover fabric, I made the straps.  I found 2 big pink buttons in my sewing stash from a coat I had a couple of years ago.  So I sewed one at the bottom of each strap. I hemmed the bottom and the jumper was finished.
I found a long sleeve white t shirt in my daughter's closet that had a very small hole in the stomach, so I decided to use that t shirt since she probably wouldn't wear it again due to the hole. I used a ruler to mark off stripes and painted the stripes with red acrylic paint (*please note* I should have used fabric paint, but I had red acrylic paint on hand so I used that.) 
For the leggings....I searched and searched and could not find striped OR white leggings (see what I mean about stores never having anything I need when I need it? I couldn't even find a red and white striped shirt to make leg warmers), so I had to get creative. I bought cotton tights, cut off the foot and used a zig zag stitch to sew at the ankle.  I did waste a pair of tights trying to paint the stripes on them. Of course, I used the acrylic paint and it did not work. The paint was hard and it wouldn't stretch over my daughter's legs.  So we just made the easier choice of wearing plain white instead of stripes.
She already had black shoes so that was easy. =)
For the ears, I bought white foam sheets (because, again, I couldn't find baby pink foam) and peach acrylic paint. I cut out ear shapes from the foam. They didn't have to be perfect because Olivia's ears aren't.  I painted them peach and attached them to a plain white headband with hot glue and a couple of handstitches.
I think it turned out great! And she made the most adorable "Olivia".
 I will warn though, if it's raining even a little outside and these ears get wet, they will droop. We found that out the hard way....

See? 


Hope everyone had a fun Halloween 2013...We sure did! =)


***If you have some time, swing by my Zibbet shop and take a look around!***
http://www.zibbet.com/TheRufflyBuffalo
Thanks! =D