Wednesday, November 27, 2013

Refashion A Skirt Into An Infinity Scarf


From This...


To This....


Here's how....

This started out as a long straight skirt.  I cut off the waist band, used a seam ripper to take the zipper out, and took out the back seam to open up the skirt. I put it out on the floor to measure and cut the fabric. I wanted my scarf to be on the skinny side because I don't feel comfortable with alot of bulky material around my neck, so I measured 7 inches from the bottom of the skirt and cut from one side to the other. I realized that my strip of fabric wouldn't be long enough for an infinity scarf, so I cut two strips of fabric the same width and length.


I cut two strips so I could sew them together end to end to make them long enough.  It made my fabric strip 70".  That was just the right amount for my infinity scarf to wrap around my neck twice and be the length I was comfortable with.
Next, I folded my fabric in half lengthwise and pinned. (At this point, check to make sure both ends are the same size...if they aren't, trim them with scissors until they match. This will make it easier when you sew the ends together later on.)


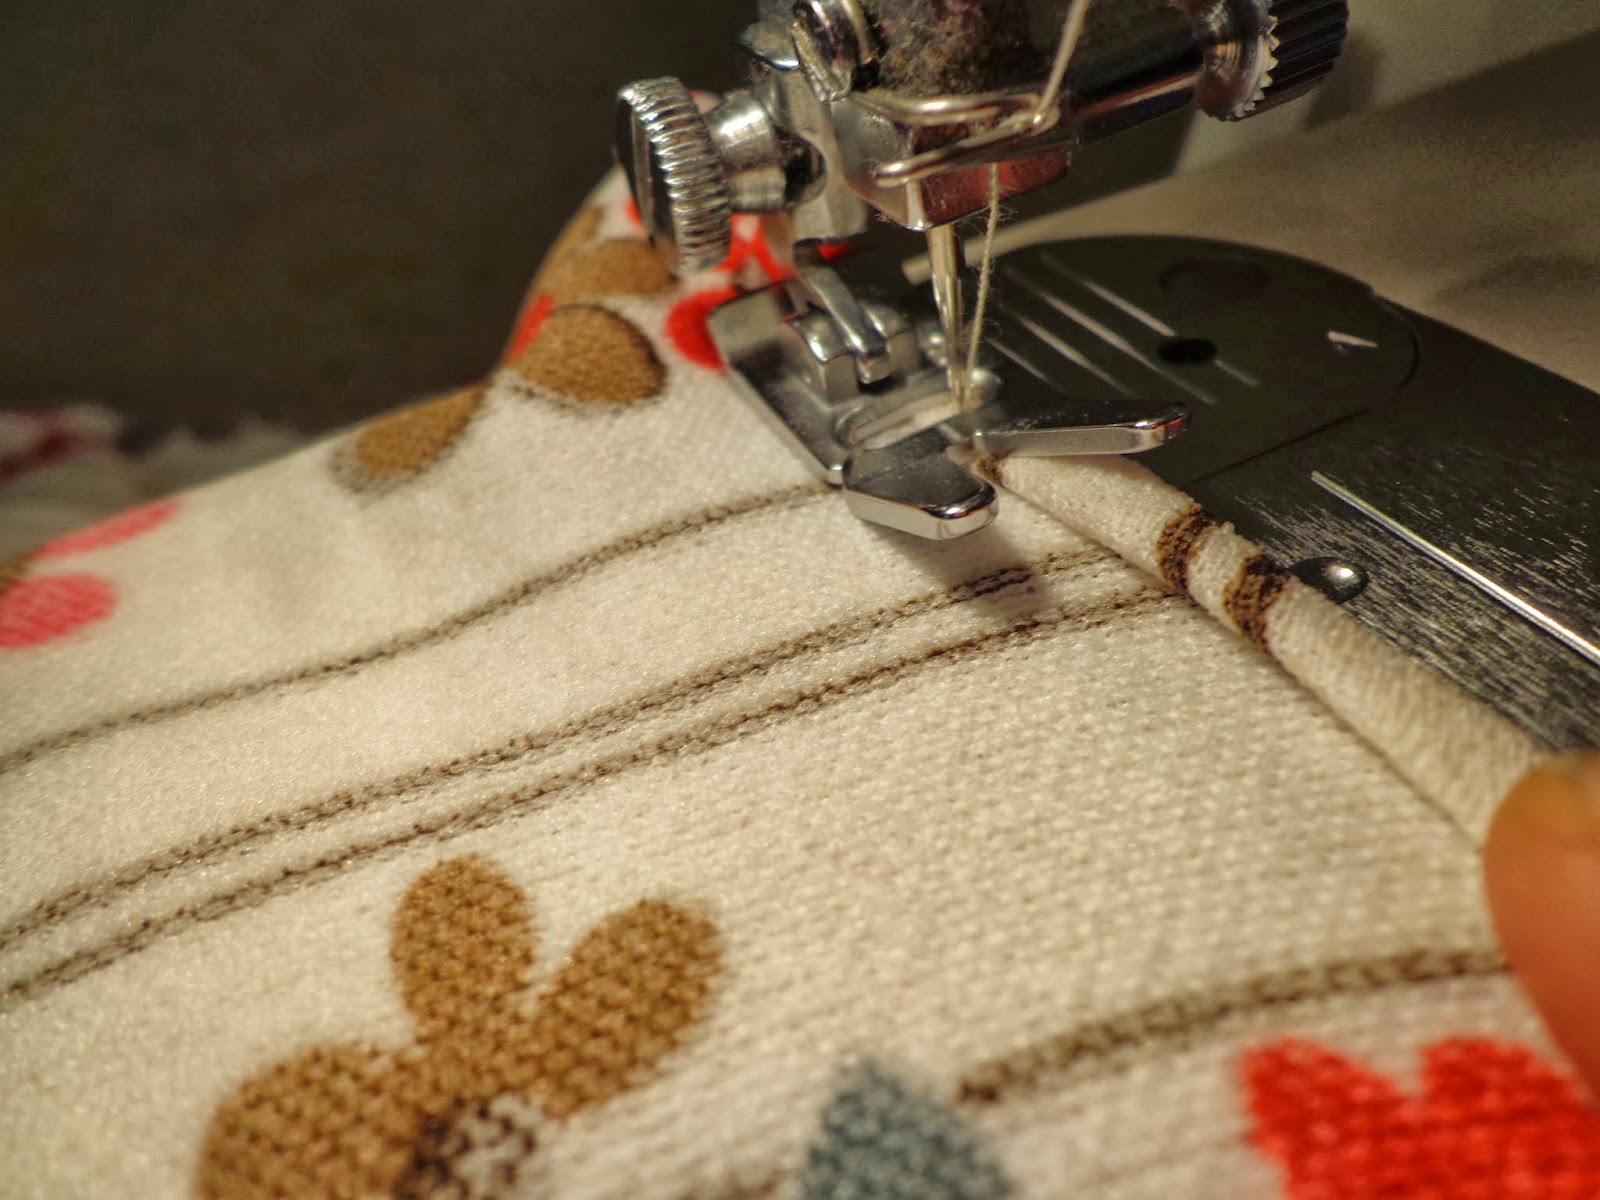
Now, onto the sewing...
I sewed down the long side with a 1/2" seam allowance.
Once I was finished sewing, I ended up with an inside out tube of fabric.


This would be the point where you would iron the seam open. I didn't do this because I'm lazy and didn't want to drag out my ironing board. I do recommend this step if you a) like things perfect or b) you are giving this as a gift.  Neither of these applied to me so I didn't care. ;)
Next, I turned the fabric right side out.


Now this is the tricky part. (not really tricky to do as much as it is explaining how to do it.)  To join the ends together, I matched up the inside seams and pinned. I put the fabric in the machine then sewed my way around the circle sewing the ends together until the circle got too small to sew. At this point, I took the fabric out of the machine, folded the raw ends under and put it back under the needle and sewed the gap shut.  This method makes the seam visible. I, however, didn't care because this scarf is for me and I knew my hair would hide the seam.  If you like things perfect or are giving this as a gift, you should hand sew the rest of the opening shut instead of putting it back in the machine.


And that's all there is to it. Super easy!
So easy, in fact, my 6 year old daughter sewed most of this one and one for herself!(With guidance, of course, but still.)
And I love that I didn't have to go out and buy fabric for this. I just used old clothes that I don't wear anymore! =)

 ****NOTE****

The scarf for my 6 year old was made the exact same way EXCEPT the fabric was cut 7" x 48" and we only cut one strip of fabric.


***If you have some time, swing by my Zibbet shop and take a look around!***

 http://www.zibbet.com/TheRufflyBuffalo


Sunday, November 10, 2013

The Wedding Gown Reveal!

DRUMROLL PLEASE.....


For the back story on when and where I bought this dress, go here.
The lady who sold me the dress originally wore it as a Halloween costume. That's probably why she parted with it for only $5.  Lucky me! =)
Right after purchasing this dress, I made a sketch of what I wanted it to look like in the end and to my surprise it actually looks ALOT like my sketch. Yay!
I've been looking at websites and bridal magazines for wedding gowns and I used the ones I absolutely loved as inspiration for this dress.
Here are a few of those gowns:
A gown from Modern Trouseau


A gown from Alfred Angelo

I know that one of these dresses cost $1500! There is no way I would pay that for something I would only wear once. 
Knowing that the pretty dresses cost that much, I was more determined than ever to turn this $5 monstrosity into the dress of my dreams.
Here's how I made it gorgeous:
The first thing I did was remove all the ruffles on the top of the dress.  Under all the frilliness was a lace covered tank style top with a sweetheart-ish neckline.
It was snug to say the least, so I decided to chop off the very top of the bodice and turn it into a strapless style with a straight across neckline.
My plan for the skirt of the dress was to take off all the lace except the bottom layer.  I was super disappointed to find that the bottom layer of lace was only sewn to the bottom half of the skirt.  The top half was only muslin. So, I had to have two layers of lace instead of one.

This is how the dress looked at this point.


Next, I had to work on the silhouette. With my hips, there was no way I was keeping the full skirt.  I really wanted a mermaid style gown. 
To make this happen, I had to take ALL the lace off of the skirt and I had to put on the dress inside out and pin the excess fabric closer to my body to make a slimmer silhouette.
This part of the refashion was a pain in my tushy. Figuratively and literally. (Hey there were stick pins where stick pins should never be!)
After about the 5th try at doing this, I finally got it right.  However, the end result of this step wasn't pretty. 


See?


Once the silhouette was refashioned, I had to sew the lace back on. Unfortunately, that mess I created with inside of the skirt was visible through the two layers of lace, so I had to sew a panel of lace under my original two layers of lace. Lucky for me that dress came with a ton of ruffles.  It left me with alot of extra matching fabric. This is how it turned out with the panel and two layers of lace when I sewed them all back on:


This picture shows a strap...that wasn't sewed on just yet. It was merely for effect to see if it would look good.  I thought I was almost finished so I emailed the above photo to my older sister Jen for her advice on how it looked. She informed me that the dress, while pretty, was still too poofy.  This led me to taking the lace off the dress and sewing it back on a bunch of times to get it tight enough to not be poofy.
I think it was precisely at that moment when I understood why lace wedding gowns are $1500! =) 


 This is how it looked when I finally made it less poofy.


Next, I sewed a piece of lace into a belt to cover the seam where the bodice and the skirt were sewn together. I sewed it directly to the gown.
The last step was to make some sort of strap or cap sleeve.
I decided on a wide strap, but chose to attach them to the dress close to the underarm instead of right on the seams of the bust.
And after all that hard work, the dress was finally complete!
I don't think I've ever been happier to complete a refashion than I was when I finished this gown. =)
Here are the front and back photos of the completed wedding dress.


I would like to give credit to my 11 year old daughter for taking the after pictures of my gown. I think she did a great job!

Here are the rest of the pictures from our photo shoot....


 Hopefully someday I'll actually get to wear this dress down the aisle. =)

Thanks for reading! 


***If you have some time, swing by my Zibbet shop and take a look around!***
www.therufflybuffalo.com


Tuesday, November 5, 2013

Halloween 2013


Me as "Mary Poppins"
(Pay no attention to the fact that I
have an open umbrella inside my house...
I like to live dangerously)
Viv as "Olivia"


This isn't gonna be a step by step tutorial. Unfortunately,  I didn't take pictures of the costume making process. Mostly because I've been working on the Olivia costume since October 1st and only when I've had extra time. So I never remembered to grab the camera. But I'll do my best to explain what I did. =)


For the Mary Poppins costume:  The only things I had to make for this costume were the bow tie and the hat. Yep, I made the hat. Because of course, when you need something, no store ever has it. EVER.  I already owned the umbrella, purse, and boots.  I got the blouse and the skirt at Goodwill.  I made the bow tie using a tutorial like this one from The Pleated Poppy . 
As for the hat...I found a cardboard box.  I cut a strip a couple of inches wide (this will determine the height of the hat).
Then I bent that strip into a circle and stapled it shut.
Next, I drew a circle on another piece of cardboard bigger than the circle I just made. This will be the brim of the hat. I cut out the middle about the same size as the circle that I stapled shut.
 I used the middle piece of cardboard that I cut out as the top of the hat. I hot glued and duct taped all of the pieces together. 
To cover the cardboard hat, I used a black sheet and hot glue. It didn't have to be perfect, because I was going to use a red ribbon/strip of fabric to cinch the sheet down.  In fact, it turned out somewhat billowy. 
After the sheet was hot glued on, I used a red piece of fabric as a ribbon around the hat and I hot glued that down.
 I then searched my house for some white and yellow flowers. (I actually had to raid a floral arrangement in my living room, but it was totally worth it.) And I hot glued those on.  Once that was done, my Mary Poppins costume was complete. =)


For the Olivia costume:  I actually made most of this costume. I had a pair of red capri pants that I knew I would never ever wear.  So I seam ripped the legs and crotch open all the way to the waistband. Then, I sewed the seams straight down in the front and the back. With leftover fabric, I made the straps.  I found 2 big pink buttons in my sewing stash from a coat I had a couple of years ago.  So I sewed one at the bottom of each strap. I hemmed the bottom and the jumper was finished.
I found a long sleeve white t shirt in my daughter's closet that had a very small hole in the stomach, so I decided to use that t shirt since she probably wouldn't wear it again due to the hole. I used a ruler to mark off stripes and painted the stripes with red acrylic paint (*please note* I should have used fabric paint, but I had red acrylic paint on hand so I used that.) 
For the leggings....I searched and searched and could not find striped OR white leggings (see what I mean about stores never having anything I need when I need it? I couldn't even find a red and white striped shirt to make leg warmers), so I had to get creative. I bought cotton tights, cut off the foot and used a zig zag stitch to sew at the ankle.  I did waste a pair of tights trying to paint the stripes on them. Of course, I used the acrylic paint and it did not work. The paint was hard and it wouldn't stretch over my daughter's legs.  So we just made the easier choice of wearing plain white instead of stripes.
She already had black shoes so that was easy. =)
For the ears, I bought white foam sheets (because, again, I couldn't find baby pink foam) and peach acrylic paint. I cut out ear shapes from the foam. They didn't have to be perfect because Olivia's ears aren't.  I painted them peach and attached them to a plain white headband with hot glue and a couple of handstitches.
I think it turned out great! And she made the most adorable "Olivia".
 I will warn though, if it's raining even a little outside and these ears get wet, they will droop. We found that out the hard way....

See? 


Hope everyone had a fun Halloween 2013...We sure did! =)


***If you have some time, swing by my Zibbet shop and take a look around!***
http://www.zibbet.com/TheRufflyBuffalo
Thanks! =D


Saturday, October 5, 2013

Easy Tunic Tutorial


I have had this fabric for a while now.


 I believe I bought it at a yardsale last year. I know I didn't spend alot. I think it was less than a dollar.  And I'm not sure how much there was. If I had to guess (and that's what I'm doing because, like an idiot, I didn't measure this before I started cutting), I would say it was about a yard of fabric.
I knew I wanted to make something to wear. I've searched and searched for the perfect tutorial, and I never really found one I was in love with. So today, I decided to make a tunic for my daughter without the help of a tutorial.  What I really love about this is I didn't have to put in sleeves!  
The materials I needed for this were:
Fabric- I had about a yard of knit fabric...but it just depends on the size of the shirt 
Thread - a color that goes with your fabric
Elastic - I used 1/4" wide for the sleeves and 1/2" wide for the waist
Scissors
Stick Pins
Sewing Machine
Measuring Tape
And a tshirt that fits to use as a pattern
I folded my fabric in half. I pinned the open sides together so the fabric wouldn't move around while I was cutting out the tunic.
I grabbed a tshirt from my daughter's closet. I chose one that fit comfortably and was a little long on her.
I lined up the shoulders of the shirt on the fold of the fabric. 
 I pinned the shirt down face down. I used a piece of red chalk to outline the tshirt.  I left about an inch between the top of the shirt and the outline. This was to make sure the tunic was a little loose and for a 1/4" seam allowance  I drew a curved line where the armpit is. From the armpit to the bottom of the shirt, I flaired out my outline. I wanted the shape to be more like a dress than a tshirt.  I freehanded the outline.  Once I finished outlining, I marked where the neckline of the tshirt was with 2 chalk marks.
Next, I cut along the chalk line. Be sure to keep the shoulder seams uncut, so once it's cut out, it will be all one piece. 
I cut the neckline into a boatneck style. I did this by measuring about 1/2" from the chalk mark I made at the neck and scooping down just a little until I reached 1/2" past the other chalk mark on the neckline.  
To sew the tunic, I flipped it.  With the right sides together, I sewed up the sides, bottom of the sleeves and at the top of the sleeves.
At this point, I had my daughter try it on to make sure I didn't make any mistakes.
While she had it on, I measured from her shoulder to a little above her waist.  This is where I will place the elastic. 
With the shirt inside out, I chalked a straight line where I decided to put the elastic. This will be the guide used when sewing the elastic into the tunic. This line needs to be straight all the way around or it will be noticeable once the elastic is sewn on.  
I measured around my daughter to get a measurement for the elastic. I subtracted 1 inch from this measurement.  I cut the elastic that length.  I pinned the end of the elastic to the side seam of the shirt and started sewing all the way around. I stretched the elastic while sewing to give it a gathered look.  When doing this, remember to stretch the elastic with one hand and guide the fabric through the machine with the other.
This is what it will look like on the inside after the elastic is sewn on.
When I sewed all the way around, I had my daughter try on the shirt AGAIN to make sure it looked even.
With the tunic inside out, I sewed a small piece of elastic (probably 3-4" long) on the top seam of the sleeve. I did this by stretching the elastic while sewing.


This is how it should look after the elastic is sewn on


The only thing left to do was finish the raw edges of the sleeves, neckline, and bottom of the tunic.
This tunic from start to finish only took about an hour, but it is super comfy and totally adorable! =)


***If you have some time, swing by my Zibbet shop and take a look around!***
 http://www.zibbet.com/TheRufflyBuffalo


Thursday, October 3, 2013

Super Cute Dress Tutorial


With about a yard of fabric (with a little bit of stretch) and a black bedsheet, I made this cute, little dress!         


You may remember the flowered fabric from a purse I made a couple of weeks ago.
I love that I had enough left to make the top of this dress.  For the bottom, I used an old black bedsheet that I had.  It had a hole in it, so I put it in my sewing stash. Using sheets as sewing fabric is a fun thing to do. I like getting old sheets and pillowcases from yardsales and thrift shops. It's great because it's alot of fabric and it's usually super cheap.  Which is perfect for the person just learning to sew. If you make a mistake, you won't be out a ton of money.

Here's how I made the dress:

For the top of the dress: I folded the fabric in half.  I used my favorite tank top as a pattern. I laid out the tank top on the fabric and pinned it in place. I used a piece of chalk to outline the tank top.


Next, I cut along the chalk line.
I cut the front of the neckline a little lower than the back (like the tank top).


I flipped it inside out and sewed up the sides, leaving the armholes open.
At this point, I tried it on to make sure it fit and looked right.

Then, I finished the raw edges of the neckline and armholes by folding the fabric under twice and sewing.


I tried it on again. With my chalk I marked where I wanted the waistline of my dress.


Ok, now onto the bottom of the dress:

I measured from the chalk line to where I wanted the hemline of my dress to be.  Then I measured around where I wanted the waistline of my dress.  I multiplied the waistline measurement by 1.5.  My original measurements were 27" length (I like to overshoot the length...I can always shorten at the end.) and 33" waist.  So I needed to cut out a rectangle from the bedsheet (I used a queen sized sheet) that was
27"x 49.5".
Once that was cut out, I folded it with right sides together and sewed up the short edges. 
To keep from having any closures in this dress, I added elastic to the waist of the skirt part of the dress.  To do this, I measured around my waist. I took that measurement and cut my elastic to that length. I used 3/4" elastic.  When sewing the elastic to the top of the skirt, I stretched the elastic as I was sewing.
                                  
              Now to attach the top to the bottom:                                                
I trimmed the length of the top about an inch below the chalk line. 
With both pieces inside out, I pinned them together. I made sure to place the pins below the elastic. 
Next, I sewed along the path of the pins. 
I tried on the dress. I wasn't happy with the length, so I cut the bottom to a better length.
I finished the dress by hemming the bottom.

I added a cute belt. =)
I love the fact that this dress doesn't have a zipper or buttons.
 I also love the fact that this dress can be worn in the summer or winter.
For the cold weather, I can put on a cute black cardigan and a pair of black tights. =)


 ***If you have some time, swing by my Zibbet shop and take a look around!***

 http://www.zibbet.com/TheRufflyBuffalo


Monday, September 23, 2013

The Prettiest Way To Wear Sweats


Ahh, Sweats.  So soft, so comfy.  Totally unattractive.
Not anymore. I decided to transform this pair into a cute skirt! 
First, I cut off the sweats to a reasonable skirt length. Next, I grabbed my seam ripper and took out the seams of the crotch and legs.
It looked like this:
I turned the "skirt" inside out, and pinned up the seam to make it straight.
Then I sewed along those pins.


I did that to the front and the back.

Now, onto the ruffle.  I used the legs of the pants that I cut off.  I cut the cuffs off of the legs, and opened up the legs by cutting up the leg seam.


Next, I cut strips about 3"-4" wide from the legs.  I sewed them together to make one long strip.  Once I did that, I put a gathering stitch in the strip to make the ruffle. I did a gathering stitch by putting my thread ease on 9 and my stitch length on 5.

Then I attached the ruffle to the skirt. I did this by having the skirt right side out and pinning the ruffle on the outside of the skirt with the right sides of the ruffle and skirt together.
I sewed the ruffle on.


And this is what the comfy sweats look like now:


Pretty right?
Now it's possible to wear Sweats to the office. ;)


The new prettier way to wear sweats and a tee!  =)

**If you have some time, swing by my Zibbet shop and take a look around!**
www.therufflybuffalo.com

Thanks! =D